Does your laptop’s optical drive refuse to read discs, make grinding noises, or fail to eject? It may be time to replace internal DVD drive in laptop. While many ultrabooks have abandoned optical drives, millions of older and mid-range laptops still come with a built-in slim DVD drive. Learning to replace DVD drive in laptop is not only cost-effective but also surprisingly simple. In this guide, we’ll show you exactly how to replace internal DVD drive in laptop in under 20 minutes.

Why You Might Need to Replace Internal DVD Drive in Laptop
There are several common reasons to replace internal DVD drive in laptop: the drive no longer reads CDs or DVDs, the laser lens is worn out, the tray gets stuck, or the drive produces excessive vibration. By choosing to replace internal DVD drive in laptop, you avoid buying an external USB drive and keep your laptop’s original functionality intact. Plus, a new internal drive often supports faster write speeds and better media compatibility. So if you still rely on physical discs, learning to replace internal DVD drive in laptop is a valuable skill.
Tools and Preparation Before You Replace Internal DVD Drive in Laptop
- A replacement slim SATA DVD drive (make sure it matches your laptop’s thickness: 9.5mm or 12.7mm)
- A small Phillips-head screwdriver (#00 or #0)
- A plastic spudger or old credit card (to pry the bezel)
- Anti-static wrist strap (optional but recommended)
- A clean, well-lit workspace
Before you attempt to replace internal DVD drive in laptop, power down your laptop, unplug the charger, and remove the battery (if removable). This ensures no electrical current flows while you work. Once prepared, you are ready to replace internal DVD drive in laptop safely.
Step-by-Step: How to Replace Internal DVD Drive in Laptop
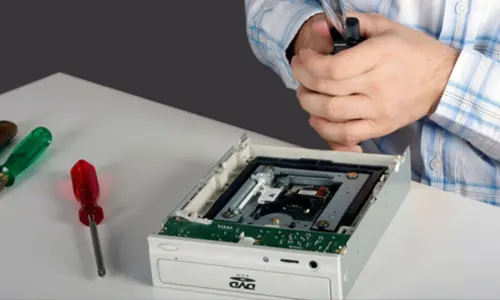
Step 1: Locate and Remove the Old DVD Drive
Most laptops have the optical drive on the right or left edge. Look for a small release latch or a screw on the bottom panel near the drive. On many models, you must first remove a single screw that holds the drive in place. After removing that screw, gently pull the drive out using the tray edge or a small flat tool. If it doesn’t slide out easily, double-check for additional screws. Now you can proceed to replace internal DVD drive in laptop by extracting the old unit completely.
Step 2: Detach the Drive Bezel (Front Plastic Panel)
The front bezel (the plastic faceplate with the eject button) is often model-specific. To successfully replace internal DVD drive in laptop, you will need to transfer this bezel from the old drive to the new one. Use a spudger to carefully pop off the bezel from the old drive. There are usually small clips on the sides. Be gentle to avoid breaking them. Once removed, set the bezel aside — you will attach it to the replacement drive before installation.
Step 3: Install the Bezel onto the New Drive
Take your new slim DVD drive and align the bezel with the front of the drive. Press firmly until you hear the clips snap into place. Make sure the eject button aligns correctly with the mechanism. This step is crucial when you replace internal DVD drive in laptop because a poorly attached bezel can prevent the tray from opening or cause alignment issues. After attaching the bezel, your new drive is ready for insertion.
Step 4: Insert the New Drive and Secure It
Slide the new drive into the laptop’s drive bay until it is flush with the chassis. Push gently but firmly — you should feel it connect to the internal SATA port. Then reinstall the screw that held the old drive. Without this screw, the drive may wobble or disconnect. Tighten it just enough to hold the drive in place. Now you have successfully learned to replace internal DVD drive in laptop physically.
Step 5: Test Your New Internal DVD Drive
Reinsert the battery (if removed), plug in the power, and boot up your laptop. Your operating system should automatically detect the new drive. Insert a DVD or CD to verify read/write functionality. If the drive is not recognized, check the SATA connection by reseating the drive. Once confirmed, you have completed the mission to replace internal DVD drive in laptop — enjoy your fully functional optical drive again!
Common Mistakes When You Replace Internal DVD Drive in Laptop
Even a straightforward upgrade can have pitfalls. Avoid these errors when you replace internal DVD drive in laptop:
- Buying the wrong drive thickness: Measure your old drive (9.5mm for most ultrabooks, 12.7mm for older, thicker laptops).
- Forgetting to transfer the bezel: Without the correct faceplate, the drive won’t fit or look right.
- Losing the tiny screw: Keep the mounting screw in a small container — it’s often unique to your laptop.
- Using excessive force: If the drive doesn’t slide in, check for obstructions; never jam it.
By being mindful of these issues, you can smoothly replace internal DVD drive in laptop on the first try.
Where to Find a Reliable Replacement DVD Drive for Your Laptop
Now that you know how to replace internal DVD drive in laptop, you need a quality replacement. Our online store stocks a full range of slim SATA DVD drives in both 9.5mm and 12.7mm heights. All drives are brand new, tested for compatibility with major laptop brands like Dell, HP, Lenovo, Acer, and ASUS. When you decide to replace internal DVD drive in laptop, choose a drive that matches your original specifications for plug-and-play installation. We offer fast worldwide shipping and a 1-year warranty on every drive. Need help identifying your drive size? Contact our support team — we’ll guide you to the correct part so you can replace internal DVD drive in laptop with confidence.
Final advice: Replacing an internal DVD drive is one of the easiest laptop repairs you can do at home. Don’t let a broken optical drive limit your laptop’s usefulness. Follow this guide, get the right replacement, and replace internal DVD drive in laptop today. Your old discs will thank you!